CustomField: Difference between revisions
Jump to navigation
Jump to search
No edit summary |
(add info about external data sources) |
||
| Line 61: | Line 61: | ||
:* Click on the desired user from Admin -> Users -> Select, this will bring you to the Modify User page where you can update the custom field accordingly | :* Click on the desired user from Admin -> Users -> Select, this will bring you to the Modify User page where you can update the custom field accordingly | ||
== External Custom Fields == | |||
In addition to manually specifying the Custom Field values you can have an external data source for them. For this you need to write a perl module, put it in the proper directory and set the [[SiteConfig|RT_SiteConfig]]. For details see the [https://docs.bestpractical.com/rt/4.4.6/extending/external_custom_fields.html|manual]. | |||
[[Category:RT44]] | [[Category:RT44]] | ||
Revision as of 08:23, 24 July 2023
A Custom Field (CF) is a user defined property that can be applied to various parts of RT. Each custom field has a Name, Description and Type.
Custom Field Types
RT supports the following CF types:
- Select one value
- Select multiple values
- Enter one value
- Enter multiple values
- Fill in one text area (of which you can edit the size: ChangeCustomFieldTextAreaSize)
- Fill in one wikitext area
- Upload one image
- Upload multiple images
- Upload one file
- Upload multiple files
- Combobox: Select or enter one value
- Enter one value with autocompletion
- Enter multiple values with autocompletion
- Select date
- Select datetime
- Enter one IP address
- Enter multiple IP addresses
- Enter one IP address range
- Enter multiple IP address ranges
You can define global CustomFields or specific to a Queue (see CUSTOM FIELDS IN QUEUES). They can apply to a Ticket, Article, Asset, Group, User or Ticket Transactions.
How to set up a custom field in a nutshell
First, create the Custom Field
- Login as one with admin/superuser rights
- Go to Admin -> CustomField -> Create
- Fill out the form appropriately and click Create
- From the submenu, click on "Applies to" and check and save the desired options. Note: This step is not applicable with the Custom Field types, "Groups" or "Users".
Modify CustomField Value

There are a number of ways to update a custom field's value depending on the custom field type.
- Tickets
-
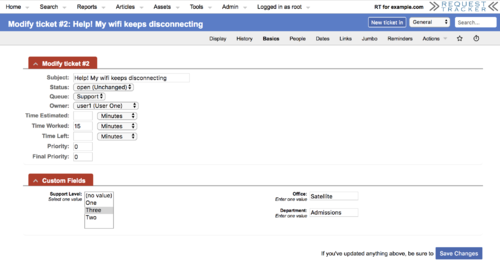
- Click on the desired ticket, then click on Basics from the submenu or click directly on the Custom Field portlet tab, to bring you to the Modify Ticket page (see screenshot)
- From the ticket, you can click on Jumbo in the submenu
- You can also update the custom fields of multiple tickets at once, by running a search, then click on Bulk Update from the submenu
- Assets
-
- Click on the desired asset, then click on Basics from the submenu or click directly on the Custom Field portlet tab, to bring you to the Modify Asset page
- You can also update the custom fields of multiple assets at once, by running a search from within Assets, then click on Bulk Update from the submenu
- Articles
-
- Click on the desired article, then click on Modify from the submenu to bring you to the Modify Article page
- Group
-
- Click on the desired group from Admin -> Groups -> Select, this will bring you to the Basics page where you can update the custom field accordingly
- User
-
- Click on the desired user from Admin -> Users -> Select, this will bring you to the Modify User page where you can update the custom field accordingly
External Custom Fields
In addition to manually specifying the Custom Field values you can have an external data source for them. For this you need to write a perl module, put it in the proper directory and set the RT_SiteConfig. For details see the [1].